The transformation of humble chicken breast into succulent, bite-sized tenders hinges on precise protein denaturation and the creation of a desirable crust through controlled heat. When chicken is subjected to heat, its complex protein structures, primarily myosin and actin, begin to unravel and coagulate. The goal for perfect tenders is to achieve this coagulation swiftly and evenly, locking in moisture while developing a flavourful exterior. This delicate balance is often achieved through techniques that ensure rapid, high-heat cooking, allowing the surface to brown and crisp (Maillard reaction) before the interior becomes dry and tough.
Complete Recipe Overview
| Property | Detail |
|---|---|
| Dish entity | Cut chicken breast into tenders |
| Cuisine origin | American comfort food |
| Defining technique | Pan-searing |
| Hero ingredients | Chicken breast, Flour, Egg |
| Critical ratio | Coating thickness to chicken surface area |
| Prep time | 15 minutes |
| Cook time | 10-15 minutes at 190°C (pan-sear) |
| Rest / chill time | 5 minutes |
| Yield | 4 servings |
| Difficulty | Easy - requires attention to temperature and timing to avoid overcooking. |
Ingredients: Quantities, Roles, and Critical Ratios
The structural logic of this recipe relies on a classic three-stage breading process, which creates a protective, flavorful barrier around the chicken. The critical ratio here is the coating thickness to chicken surface area. Too thin a coating won't provide enough textural contrast or flavor; too thick, and it can become gummy or burn before the chicken is cooked through. The flour, egg, and breadcrumb blend ensures adhesion and a crisp exterior.
- Chicken breast - 500 grams - Role: The protein base, providing lean meat that cooks quickly.
- All-purpose flour - 125 grams - Role: The first layer of the coating, helping the egg adhere and providing a base for crisping.
- Eggs - 2 large - Role: The binder, creating a sticky surface for the breadcrumbs to cling to.
- Breadcrumbs - 150 grams - Role: The primary textural element, developing a golden-brown, crispy crust when cooked. Panko breadcrumbs are recommended for superior crispness.
- Salt - 5 grams - Role: Enhances the natural flavor of the chicken and coating.
- Black pepper - 2 grams - Role: Adds a pungent bite to complement the chicken.
- Vegetable oil - 60 ml - Role: For pan-searing, facilitating heat transfer and browning.
The Science of Protein Denaturation and the Maillard Reaction
Chicken breast, composed primarily of muscle fibers, contains proteins like myosin and actin. When exposed to heat, these proteins undergo denaturation - their complex three-dimensional structures unravel. This process, along with the subsequent coagulation, is what transforms raw, pliable meat into a firm, cooked product. The goal is to achieve this coagulation just to the point of doneness, where the proteins have solidified sufficiently to hold their shape and release minimal moisture, resulting in a tender texture. Simultaneously, the Maillard reaction, a complex series of non-enzymatic browning reactions between amino acids and reducing sugars, occurs on the surface of the breaded tenders. This reaction, catalyzed by heat and facilitated by the dry surface of the flour and breadcrumbs, is responsible for the desirable golden-brown color, rich aroma, and savory, complex flavors characteristic of well-cooked chicken tenders.
Method: Pan-Searing at Every Critical Stage
This method is optimized for achieving a crispy exterior and a tender, juicy interior through controlled high-heat searing.
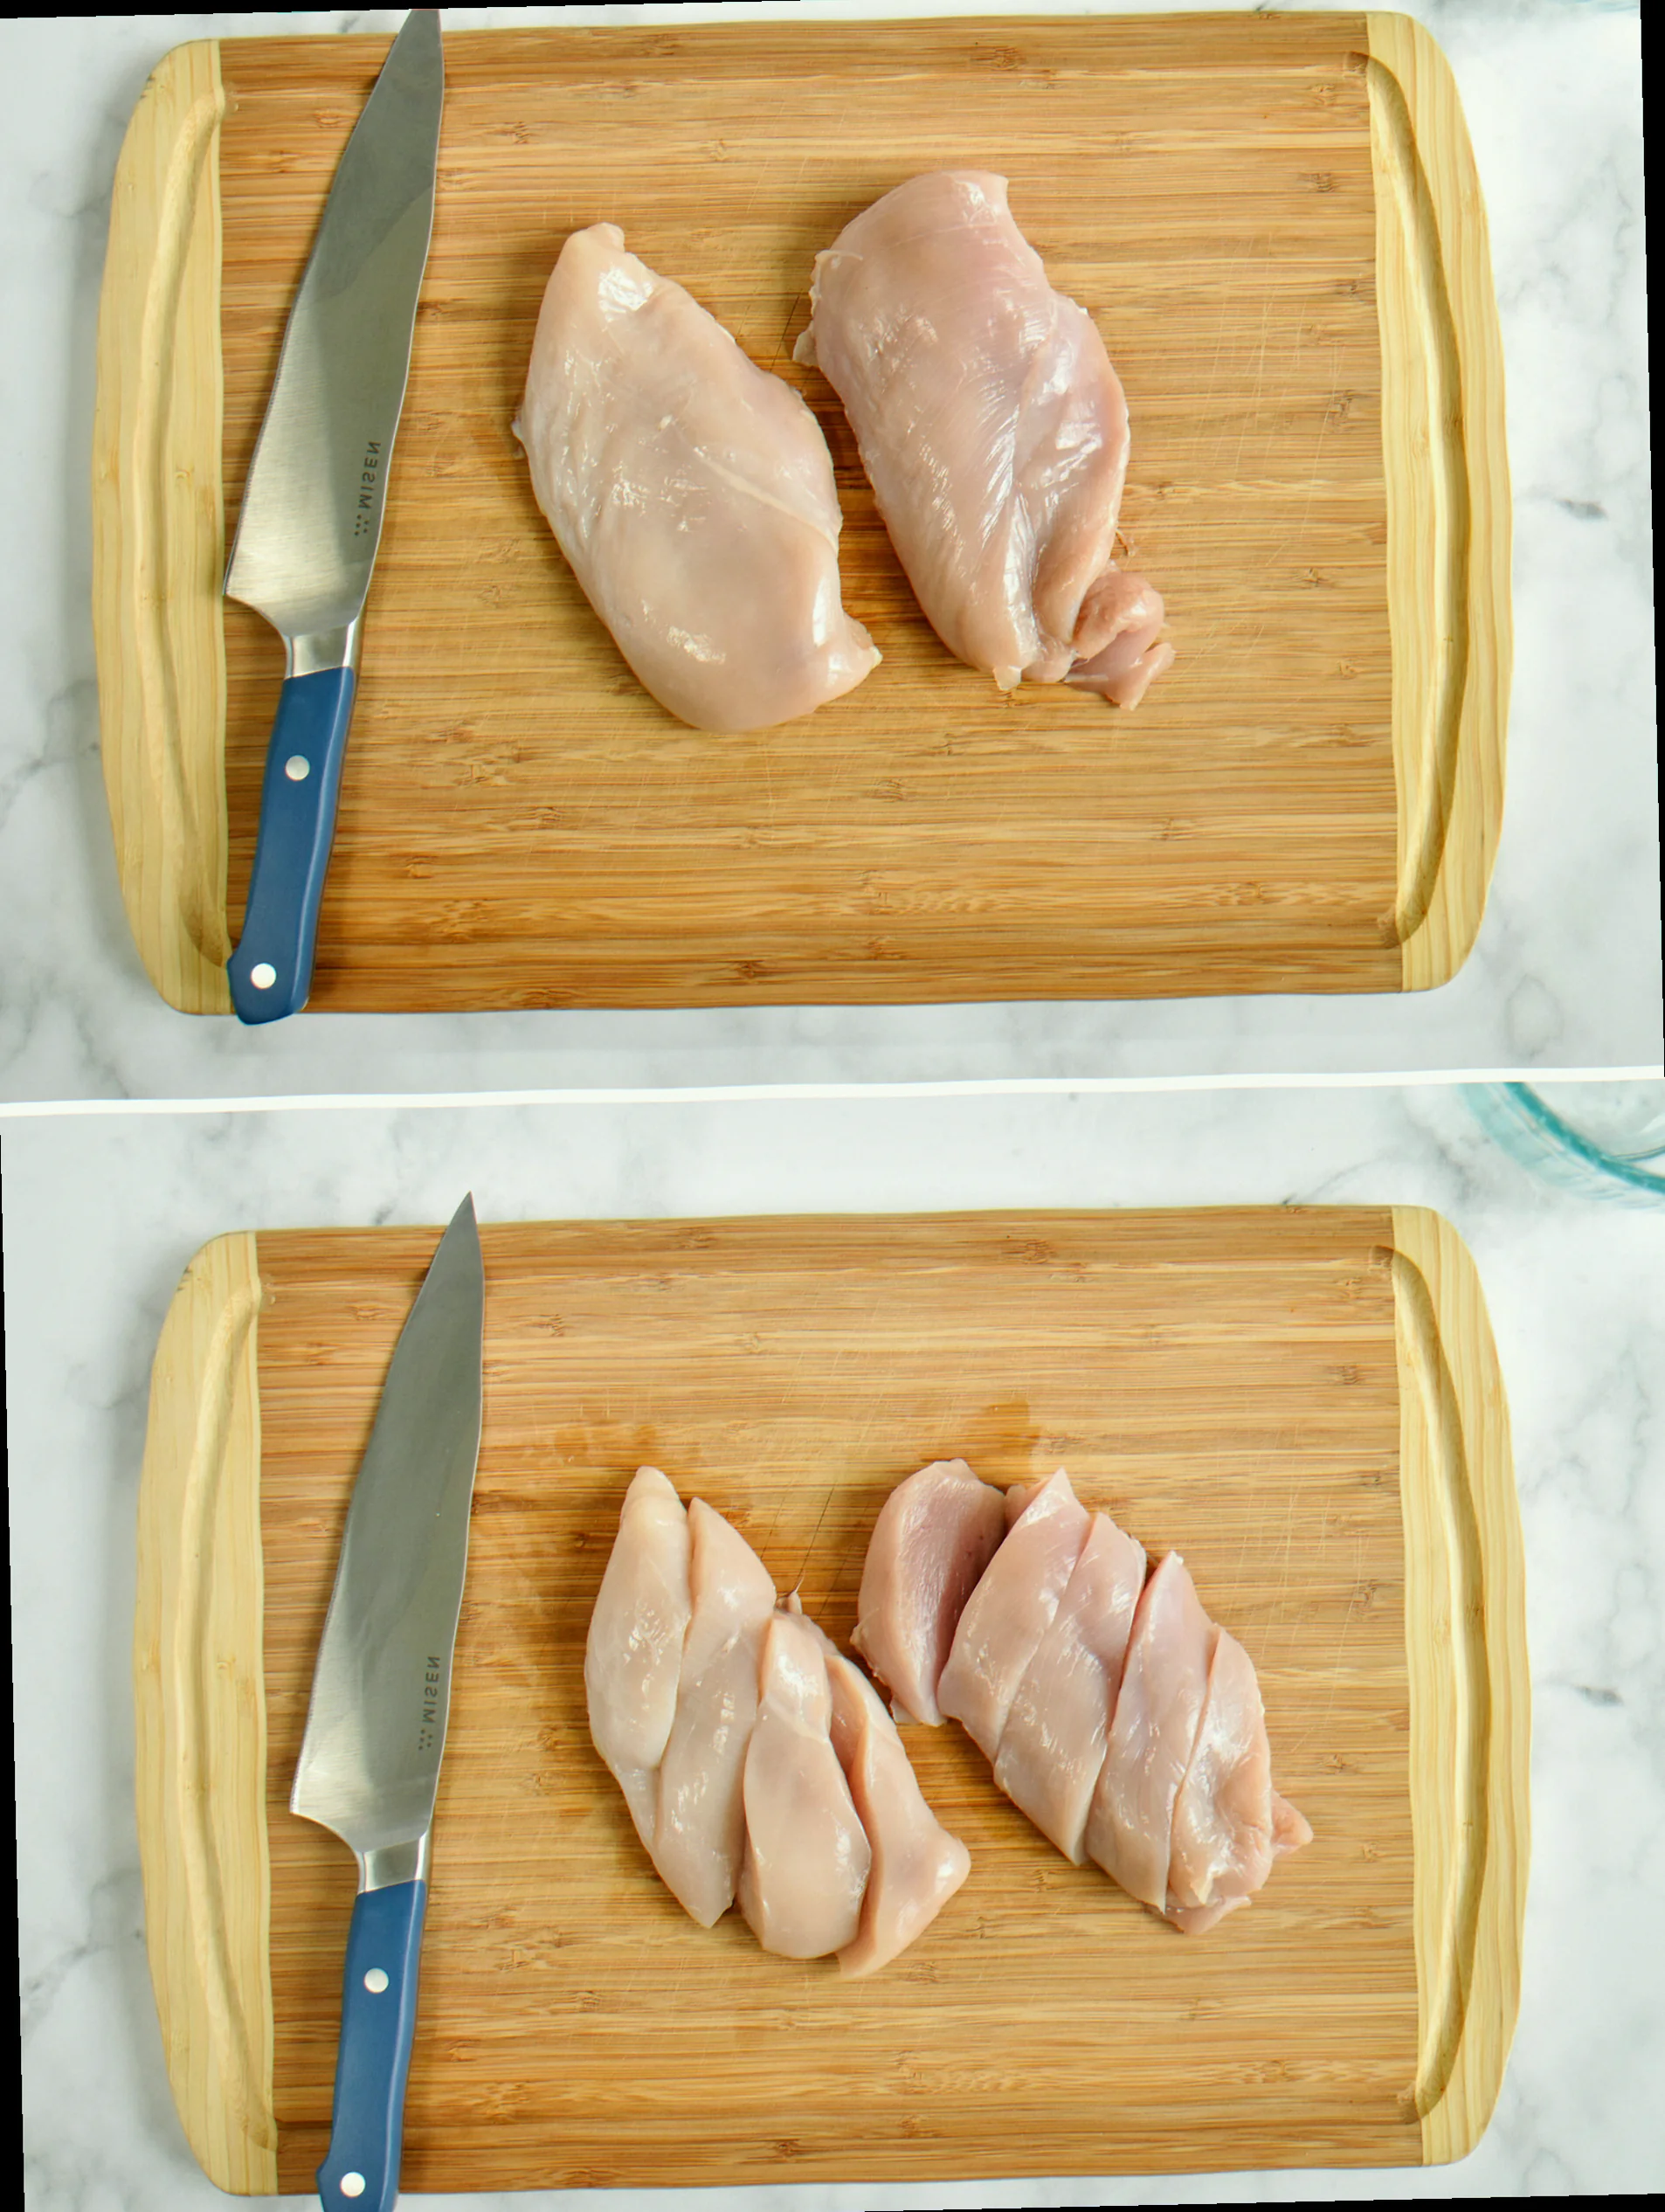
- Slice - Prepare the chicken: Using a sharp knife, cut the chicken breast into uniform strips approximately 1.5 cm thick and 7-10 cm long. Pat the chicken strips thoroughly dry with paper towels; this is crucial for coating adhesion and browning.
- Coat - Dredge in flour: In a shallow dish, combine the flour, salt, and pepper. Toss the chicken strips in the seasoned flour, ensuring each piece is evenly coated. Shake off any excess flour.
- Dip - Egg wash: In a second shallow dish, whisk the eggs until well combined. Dip each floured chicken strip into the egg wash, allowing any excess to drip off.
- Crumb - Bread the tenders: In a third shallow dish, place the breadcrumbs. Press each egg-coated chicken strip firmly into the breadcrumbs, ensuring a complete and even coating on all sides.
- Sear - Heat the oil: Place a large, heavy-bottomed skillet over medium-high heat. Add the vegetable oil. Heat the oil until it shimmers and a tiny piece of breadcrumb sizzles immediately upon contact (approximately 190°C).
- Cook - Sear in batches: Carefully place the breaded chicken tenders in the hot oil in a single layer, ensuring not to overcrowd the pan. Overcrowding will lower the oil temperature and result in steamed, rather than crispy, tenders.
- Flip - Achieve golden-brown crust: Sear for 3-4 minutes per side, or until deeply golden brown and crisp.
- Critical Control Point 1 - Internal Temperature: The most common failure point is overcooking, leading to dry chicken. Use an instant-read thermometer to check the internal temperature of the thickest part of a tender. It should register 74°C. If you don't have a thermometer, look for juices that run clear when pierced with a fork.
- Drain - Remove excess oil: Using tongs, transfer the cooked tenders to a wire rack set over a baking sheet. This allows air to circulate, maintaining crispness.
- Critical Control Point 2 - Rest and Crisp: Allowing the tenders to rest for 5 minutes on the wire rack is essential. This allows the internal juices to redistribute, ensuring maximum tenderness, and allows any residual moisture on the surface to evaporate, keeping the crust crisp.
- Serve - Plate and present: Arrange the chicken tenders on a serving platter. Serve immediately with your favorite dipping sauces.
Cultural and Historical Context of American Comfort Food
While chicken tenders as a specific dish are relatively modern, their roots are firmly planted in the American culinary landscape, particularly within the realm of comfort food. The concept of breaded and fried chicken has a long history in the United States, influenced by Southern fried chicken traditions. The streamlined, deconstructed form of "tenders" emerged in the mid-20th century as a convenient and approachable way to prepare chicken breast, catering to busy families and the rise of casual dining. They became a staple in diners, fast-food establishments, and home kitchens across America, symbolizing simple, satisfying, and family-friendly fare.
Variations Across Southern American and Modern Adaptations
- Southern American Style: In many Southern variations, the breading might include cornmeal or a blend of spices like paprika, cayenne pepper, and garlic powder mixed with the flour. This imparts a slightly different texture and a more robust flavor profile.
- Spicy Buffalo Tenders: A popular modern adaptation involves tossing the freshly fried tenders in a mixture of hot sauce (typically Frank's RedHot) and melted butter. This transforms them into a spicy, tangy appetizer often served with blue cheese dressing and celery sticks.
- Gluten-Free Adaptation: For a gluten-free version, substitute the all-purpose flour with a gluten-free all-purpose flour blend and use gluten-free breadcrumbs (such as rice flour-based or almond flour-based crumbs). Ensure any seasonings used are also certified gluten-free. The texture may be slightly different, but the flavor remains comparable.
- Baked Tenders: For a lighter option, tenders can be baked. After breading, place them on a parchment-lined baking sheet and bake at 200°C for 20-25 minutes, flipping halfway through, until golden brown and cooked through. While healthier, this method sacrifices some of the crispiness achieved through frying.
Storage, Freezing, and Reheating Cut chicken breast into tenders
Cooked chicken tenders are best enjoyed fresh, but can be stored and reheated with care. For optimal texture, it is recommended to reheat them in a way that re-crisps the coating.
- Refrigerator Storage: Store cooled cooked tenders in an airtight container in the refrigerator for up to 3 days.
- Freezer Storage: For longer storage, freeze cooled cooked tenders in a single layer on a baking sheet lined with parchment paper until firm. Then, transfer to a freezer-safe bag or container. They will keep for up to 2 months.
- Reheating (Oven/Toaster Oven): Preheat oven to 190°C. Place frozen or refrigerated tenders on a baking sheet lined with parchment paper. Bake for 10-15 minutes for refrigerated tenders, or 15-20 minutes for frozen tenders, until heated through and the coating is re-crisped.
- Reheating (Air Fryer): Preheat air fryer to 190°C. Place tenders in the air fryer basket in a single layer. Air fry for 6-10 minutes for refrigerated tenders, or 10-14 minutes for frozen tenders, shaking the basket halfway through, until heated through and crispy.
- Reheating (Stovetop): Reheating on the stovetop in a dry skillet over medium heat can also work to re-crisp the coating, though it requires more attention to prevent burning.
- Note on Texture: Reheating will inevitably result in a slightly less crisp coating than when freshly cooked, especially if microwaved (which is not recommended as it makes the coating soggy). The oven or air fryer methods yield the best texture.
Pairing Cut chicken breast into tenders: Sides, Sauces, and Drinks
Cut chicken breast into tenders pair exceptionally well with classic American side dishes that offer a balance of starch and vegetable. Creamy macaroni and cheese or a crisp coleslaw provide contrasting textures and flavors. For dipping, a tangy honey mustard sauce or a classic ketchup are ideal, their sweetness and acidity cutting through the richness of the fried coating. A crisp, refreshing lager or an off-dry Riesling would be excellent drink pairings. The carbonation and slight bitterness of the lager cut through the fat, while the sweetness of the Riesling complements the savory chicken and can balance any mild heat from the breading.
Answers to the Most-Searched Questions About Cut chicken breast into tenders
What temperature should chicken tenders be cooked at - and how do I know it's done?
Chicken tenders are typically pan-seared in oil heated to approximately 190°C. They are done when the internal temperature reaches 74°C, indicated by a meat thermometer. Visually, they should be golden brown and crisp on the outside, and the juices should run clear when pierced with a fork.
What is the difference between Cut chicken breast into tenders and chicken nuggets?
The primary difference lies in the cut of chicken and the typical breading. Chicken tenders are made from strips of chicken breast, aiming for a more uniform, elongated shape. Chicken nuggets are usually made from smaller, irregular pieces of chicken (often a mix of white and dark meat) that are ground or chopped before being formed into shapes and breaded. Tenders generally have a more pronounced crispy coating due to their surface area to volume ratio and the direct searing method.
Can Cut chicken breast into tenders be made in advance, and does it freeze well?
Yes, chicken tenders can be made in advance. For the best texture upon reheating, it's recommended to cook them and then cool them completely before storing in the refrigerator for up to 3 days or freezing for up to 2 months. Reheating in an oven or air fryer is crucial to re-crisp the coating; microwaving is strongly discouraged as it will result in a soggy texture.